2026-2027
Onboarding for the current academic school year
Week 1 - Electrical / Software
Overview
Welcome to the Electrical & Software Onboarding for the 2026-2027 school year!
Goals
-
Learning
-
What is a Schematic / How to read a Schematic
-
How does a microcontroller control hardware?
-
-
Practical
-
Breadboarding a circuit
-
Running and debugging Arduino/ C++ code
-
Managing software dependencies and reading software documentation
-
Don't be afraid to ask for help!
If you are having trouble during this session, that is okay! We don't expect you to get everything perfect during your first attempt. Our officers are here to assist you.
Circuit Breadboarding
Reading a Circuit Schematic:
A schematic is just a logical and visual representation of the circuit. Below are a bunch of circuit symbols you may see on your schematic:

The schematic you'll be using to construct the project is found below:
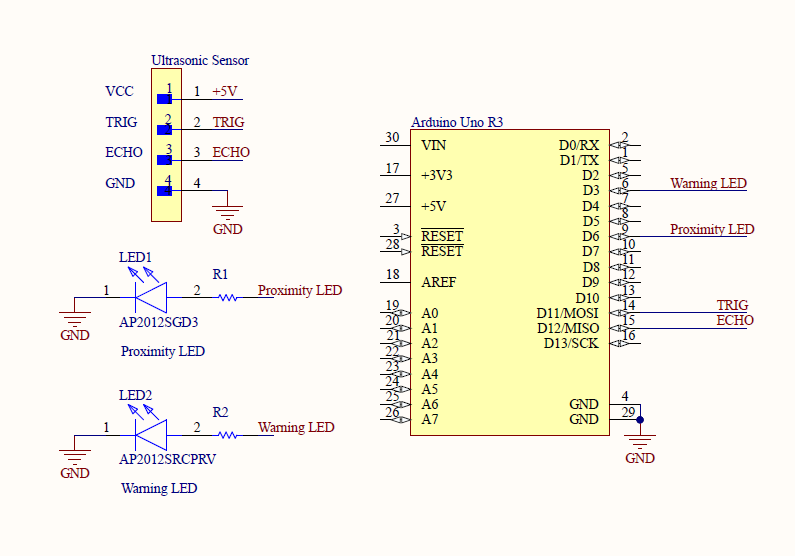
Use the schematic to construct the circuit on your breadboard. We'll be using the Elegoo Uno R3 for onboarding. Your microcontroller Once completed, you should have something similar to below:
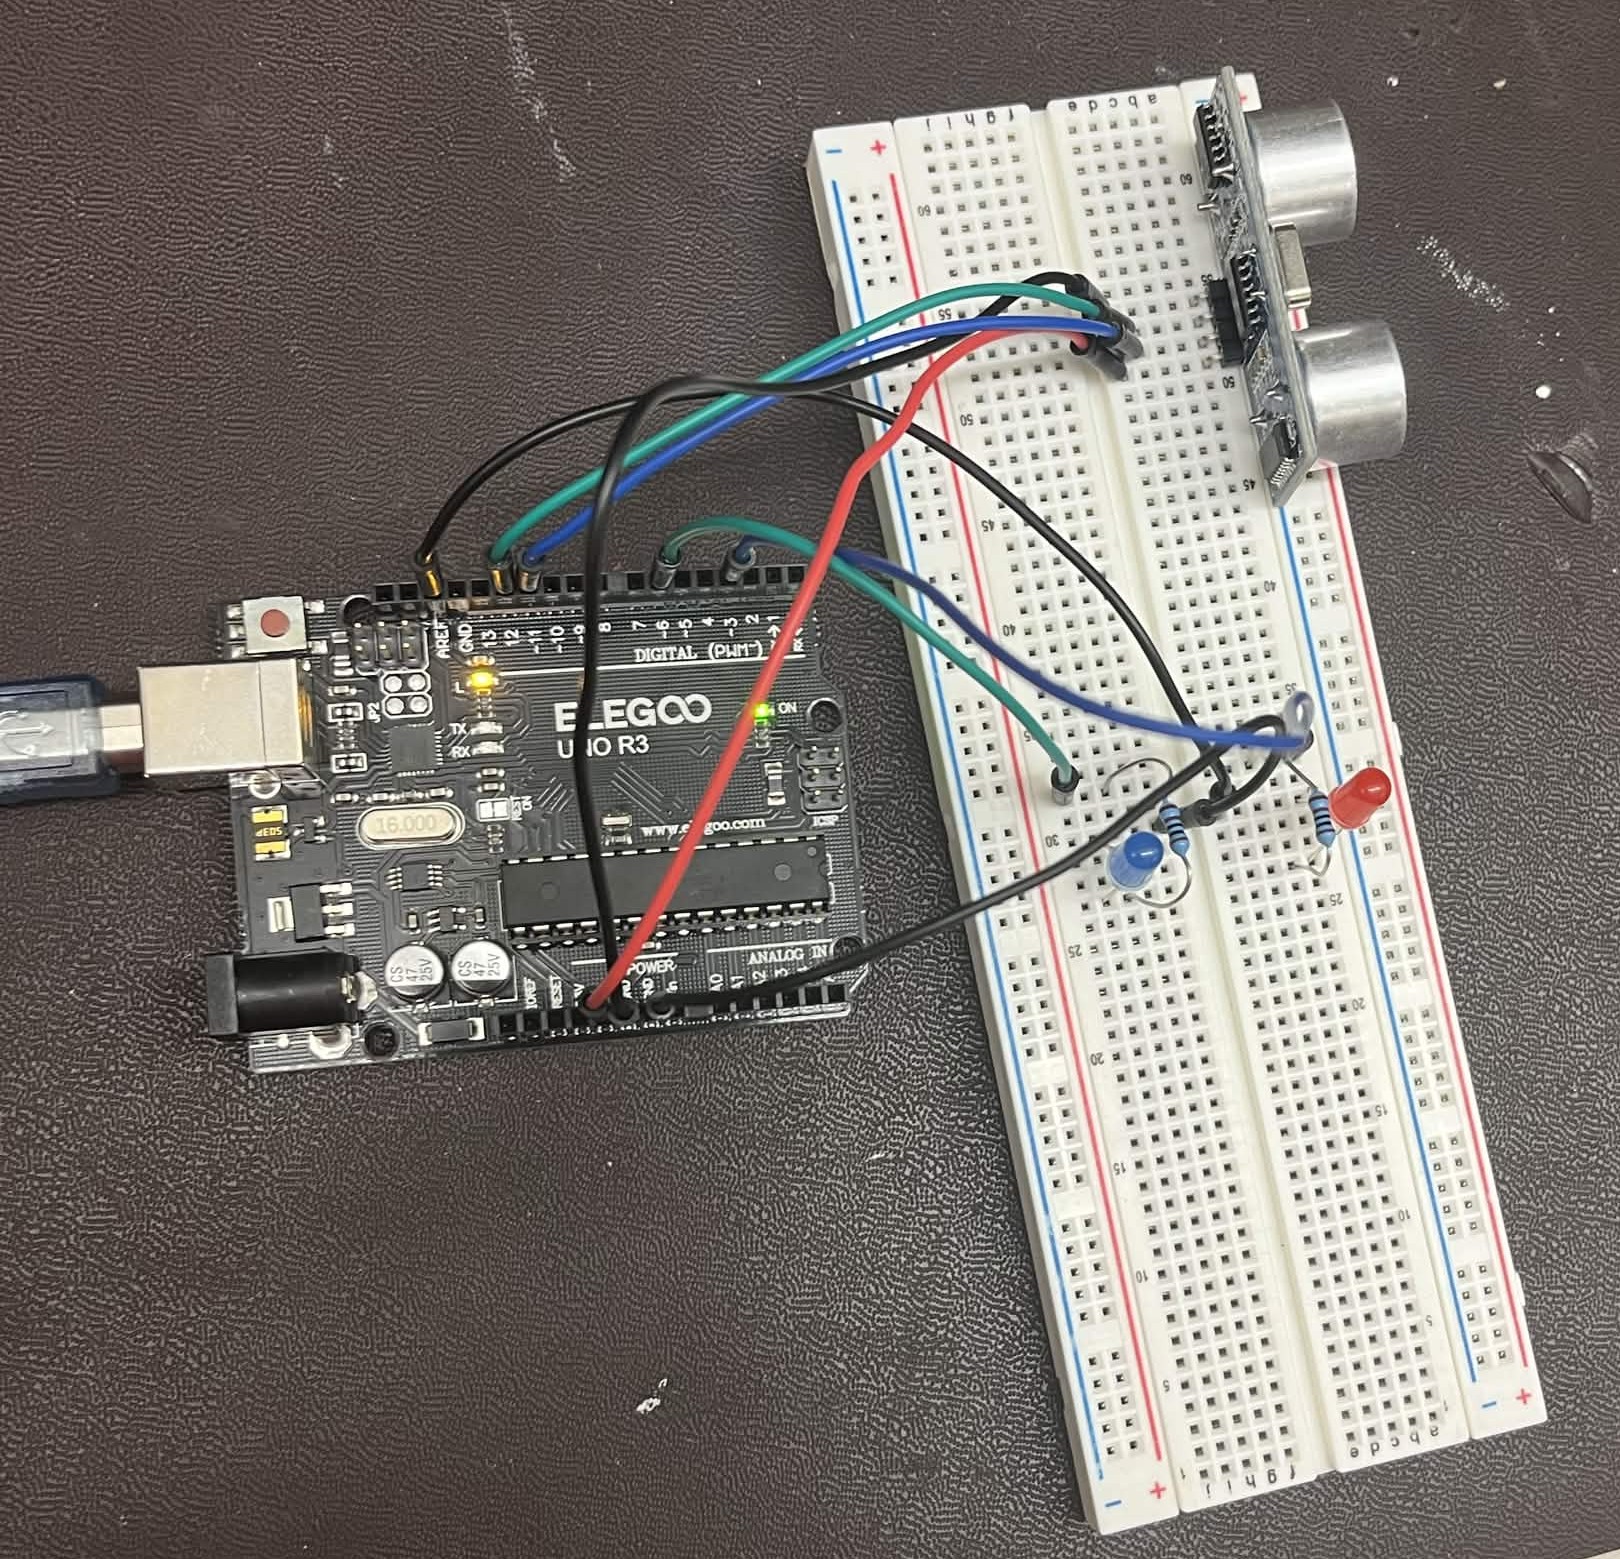
Once you have your circuit constructed, you're now ready to install and upload your project's firmware.
Downloads
Arduino:
Go here and download the version of the arduino IDE for your operating system (Windows, OSX, linux).

Compilation
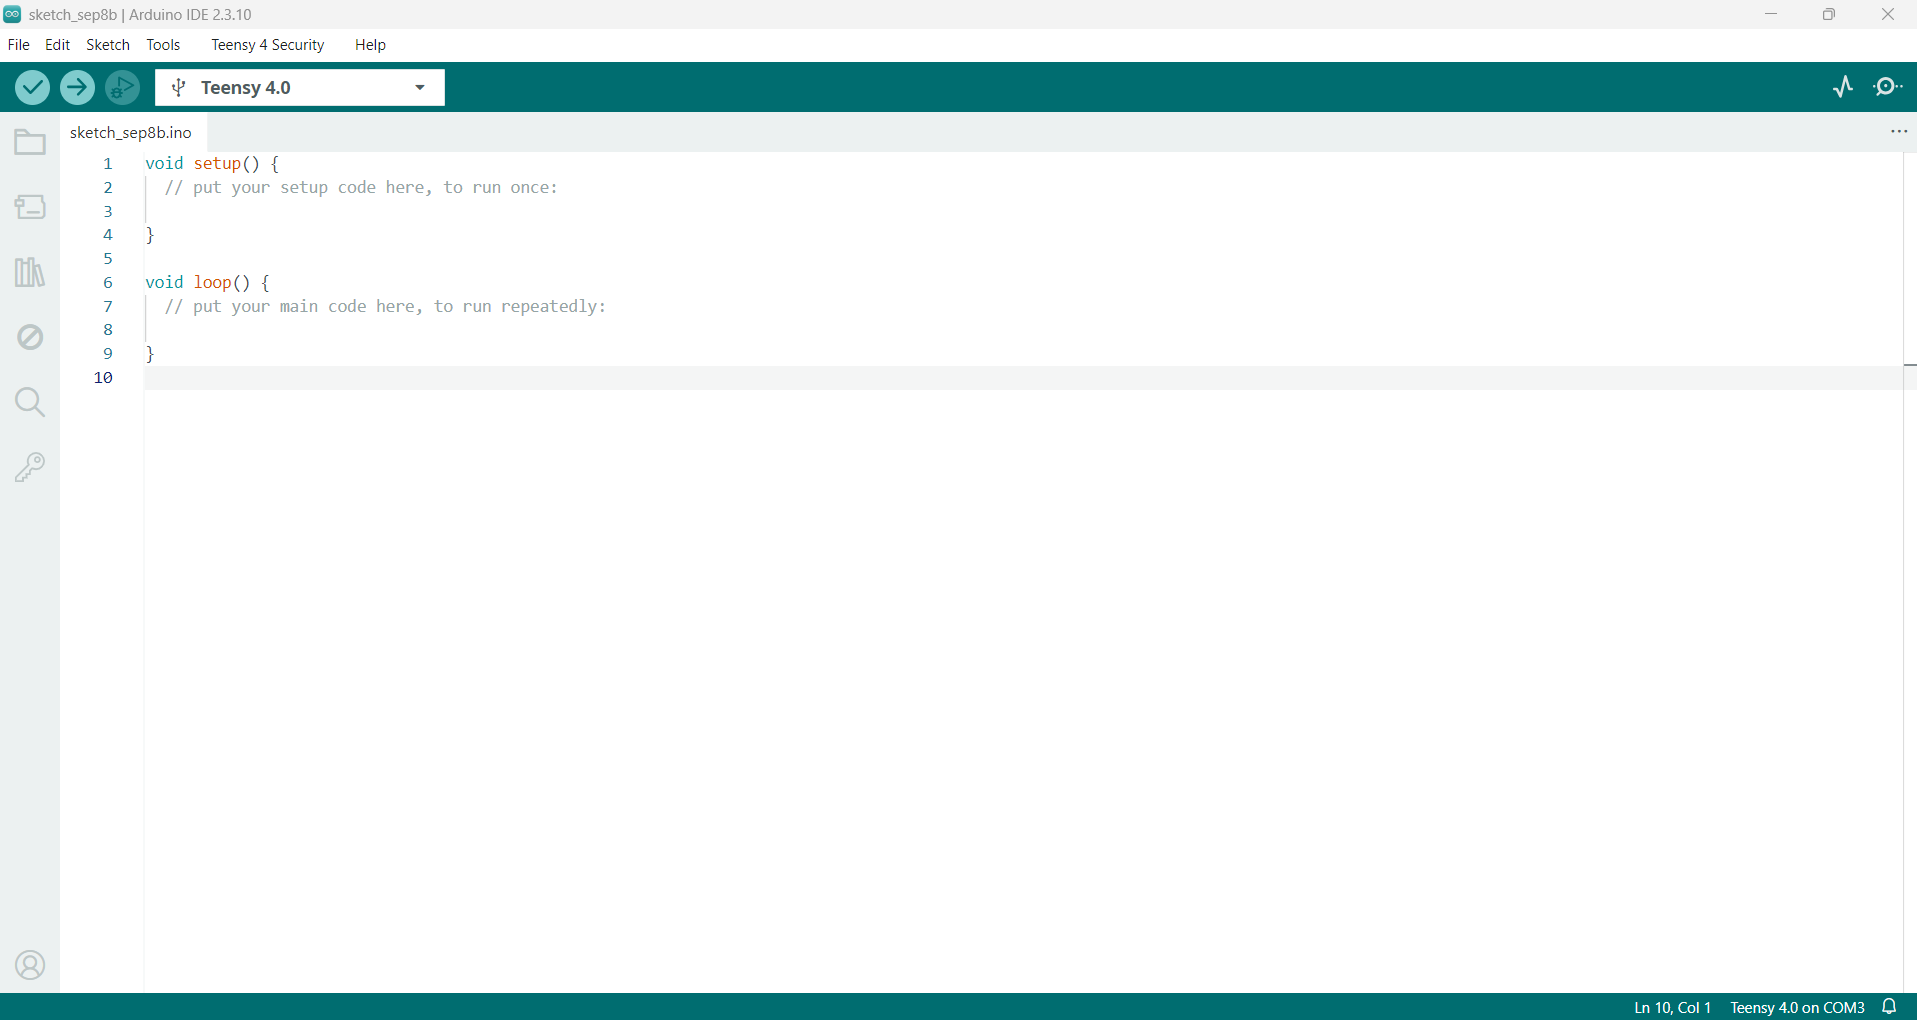
Open Arduino IDE:
Open the Arduino IDE application. If you have the correct application downloaded, you should see this window.
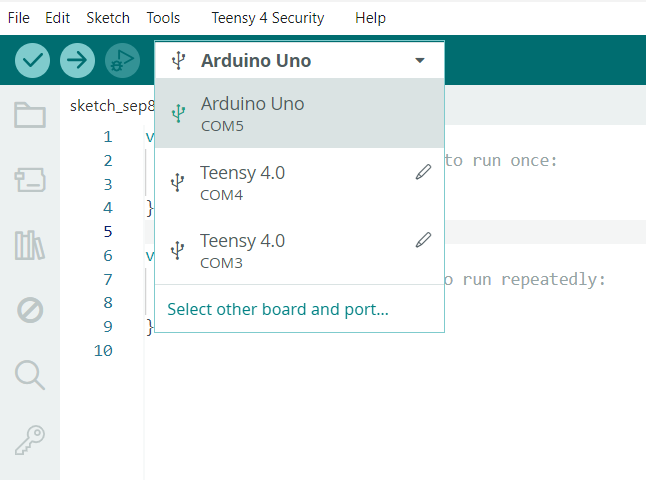
Select the Uno R3:
Connect the Uno R3 to your computer using a micro-usb cable. On the top left, you should see the option Arduino UNO appear in the drop down dialog.
Download the Board Manager:
To develop on the Uno, you need to add an additional board manager URL to the Arduino IDE.
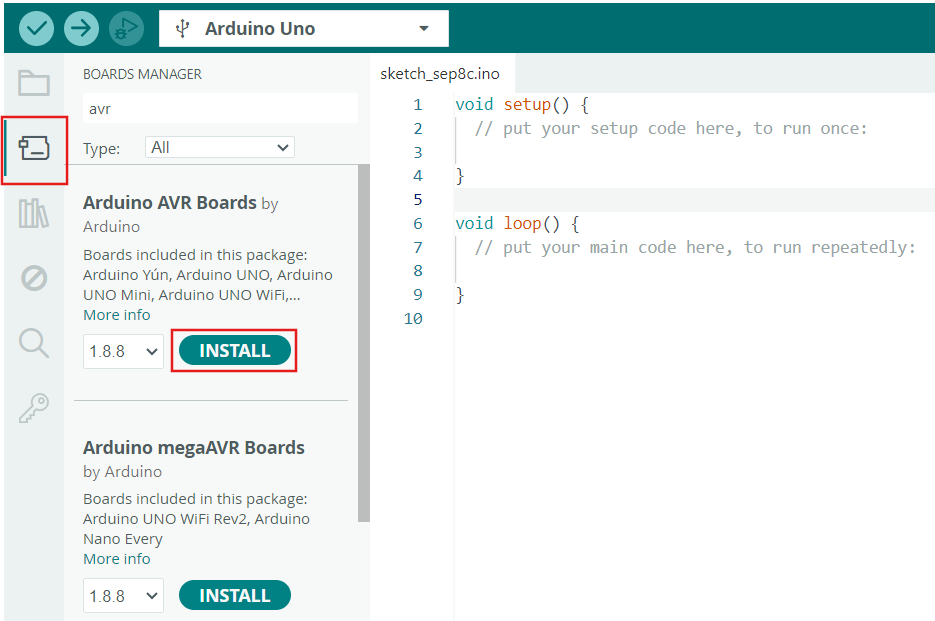
On the righthand side of the window, select the Boards Manager icon. Then, install the Arduino AVR Boards add-on. You can also try searching for the add-on via the search bar.
Verifying Source Code:
Copy this skeleton code into an arduino sketch file:
const int TRIG_PIN = 11;
const int ECHO_PIN = 12;
const int LED_PIN = 3; // warning LED (on/off)
const int BRIGHT_LED_PIN = 6; // brightness LED (must be a ~ pin)
const int DISTANCE_THRESHOLD = 5;
float duration_us, distance_cm;
int brightness;
void setup() {
Serial.begin(9600);
pinMode(TRIG_PIN, OUTPUT);
pinMode(ECHO_PIN, INPUT);
// FIX ME #1
pinMode(BRIGHT_LED_PIN, OUTPUT);
}
void loop() {
// generate 10-microsecond pulse to TRIG pin
digitalWrite(TRIG_PIN, HIGH);
delayMicroseconds(10);
digitalWrite(TRIG_PIN, LOW);
// measure duration of pulse from ECHO pin
duration_us = pulseIn(ECHO_PIN, HIGH);
distance_cm = 0.017 * duration_us;
// warning LED
if (distance_cm < DISTANCE_THRESHOLD)
digitalWrite(LED_PIN, HIGH);
else
digitalWrite(LED_PIN, LOW);
// brightness LED — gets brighter as object gets closer
brightness = map(distance_cm, 2, 30, 255, 0);
brightness = constrain(brightness, 0, 255);
analogWrite(BRIGHT_LED_PIN, brightness);
Serial.print("distance: ");
Serial.print(distance_cm);
Serial.print(" cm | brightness: ");
Serial.println(brightness);
delay(500);
}This file contains const declarations
Practice:
Edit the setup() function and replace line 14 with the following:
pinMode(LED_PIN, OUTPUT);
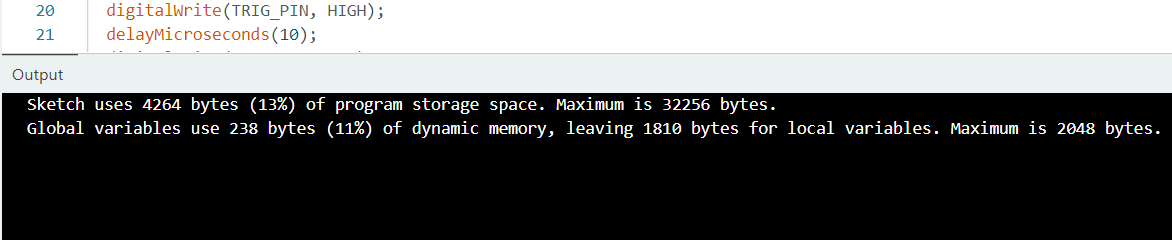
Click the check mark at the top left of the IDE to check for compilation errors. If your program compiles correctly you should see this output.
Uploading Program to Uno R3:
Click the arrow at the top left of the IDE to flash the Uno R3. If flashing doesn't work, you may need to unplug the Uno R3 and hold the Reset button on the Uno R3 (the red button) while reconnecting the micro-usb cable.

If your upload is successful, your proximity LED should turn on once you wave in front of the ultrasonic sensor.
Week 2 - Mechanical
Overview
In this onboarding, you will create an Onshape account and get added to the SCR Onshape, along with learning the basics of CAD.
Goals
- Creating an Onshape account and getting added to the SCR Onshape
- Practical
- How to draw a sketch
- How to use extrude to create a basic part
- How to use linear pattern to make many features at once
- How to mate parts together in an assembly
Don't be afraid to ask for help!
If you are having trouble during this session, that is okay! We don't expect you to get everything perfect during your first attempt. Our officers are here to assist you.
What is MCAD?
Computer-Aided Design (CAD) is the use of various programs and tools on a computer to assist engineers with design. Mechanical CAD (MCAD) refers specifically to tools for mechanical design, although it is common for MCAD to just be referred to as CAD. The most common application of MCAD is 3D design of parts and assemblies.
Part Design
Part design involves creating 3D objects. The workflow for creating a part is below:
- Create a sketch
- The sketch is often a cross-section of the part you are creating
- Draw the geometry with various tools such as lines, rectangles, circles, etc.
- Define the dimensions of the geometry using the dimension tool
- Bring your sketch into the third dimension with tools such as extrude, revolve, etc
Creating an Onshape Account
Onshape is an online browser-based MCAD program, so no download is needed. If you already have an Onshape account, feel free to skip to "Getting added to the SCR Onshape". To create your Onshape account, go to this link:
https://www.onshape.com/en/sign-up
Steps to Create an Account
- Enter your school email
- Select education
- Select student and college
- Select the student plan (should be the only option on screen)
- There will be some information to enter after selecting your plan. Enter the following:
- University of Oklahoma (OK-USA)
- ou.edu
- Graduation year
- Major
I will be using Onshape for design work on a competitive robotics team.
Getting added to the SCR Onshape
Send your Onshape email to onboarding-2026 in the Discord. We will add you to Onshape, and you should get an email with the invitation.
OnShape Introduction
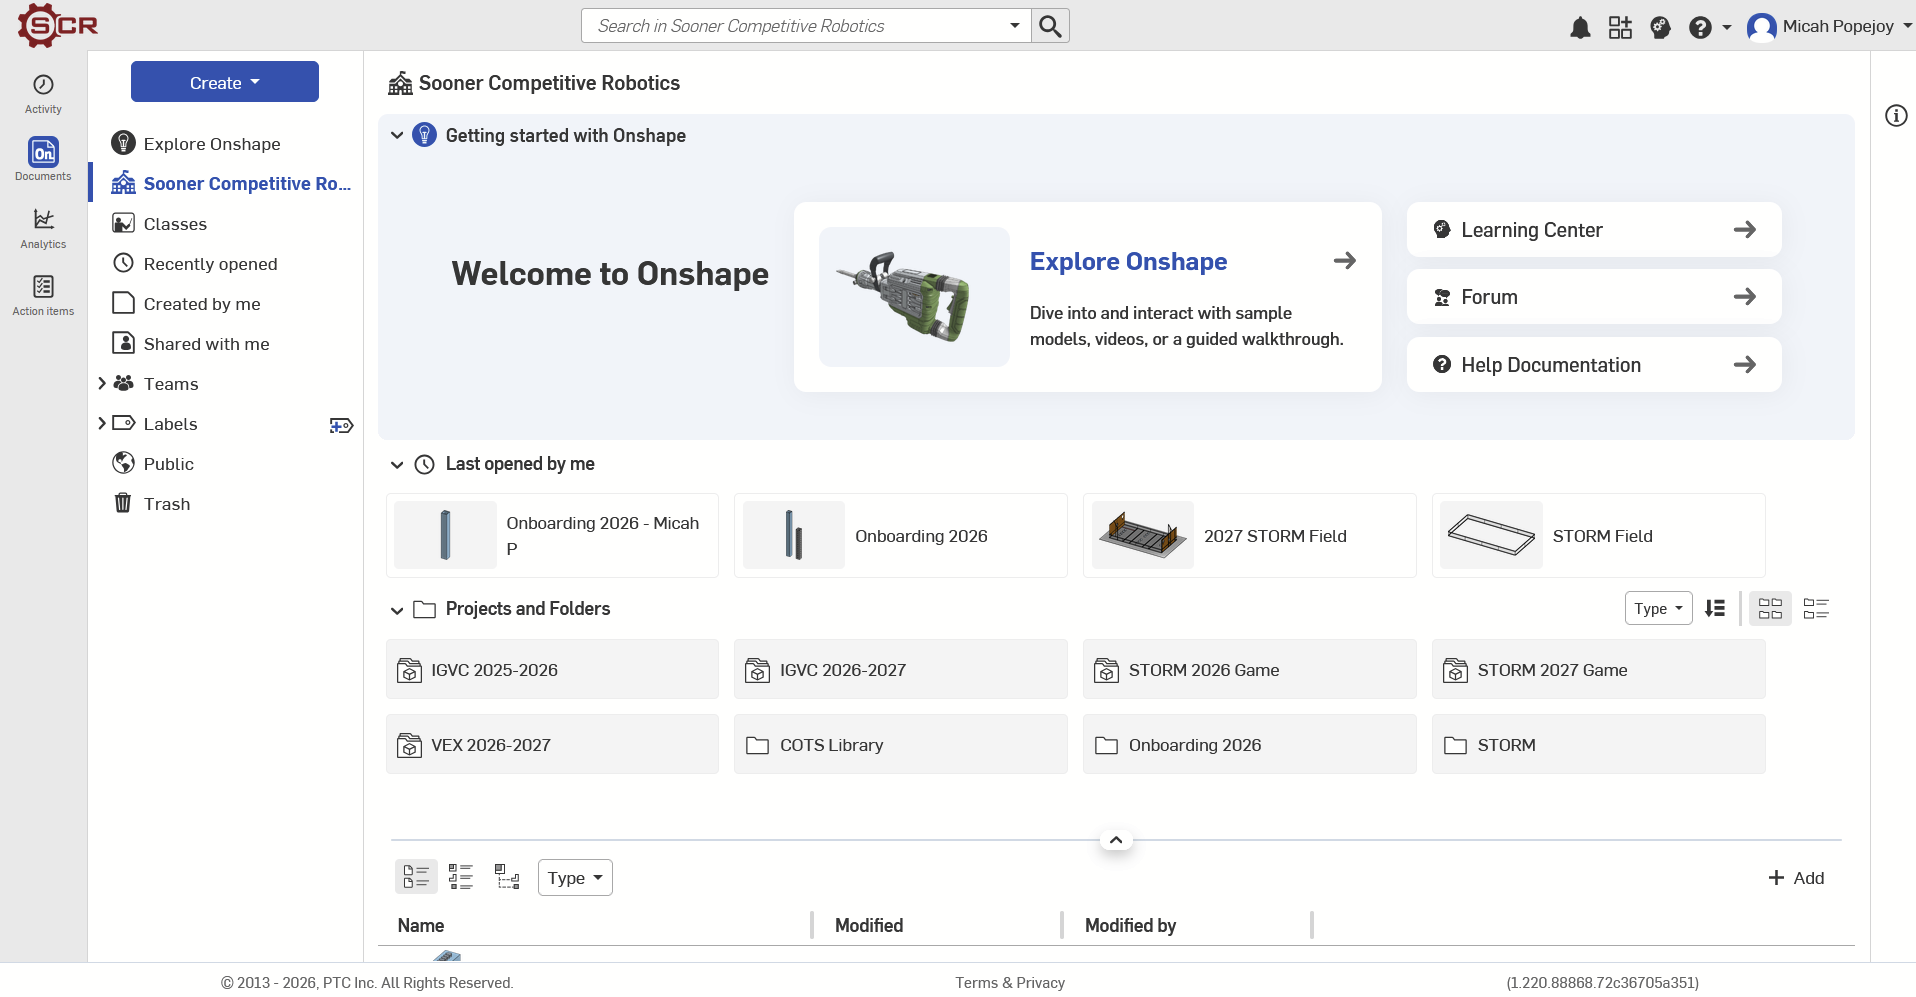
Congrats! You now have an Onshape account and have been added to the SCR Onshape! You should see a screen similar to this.
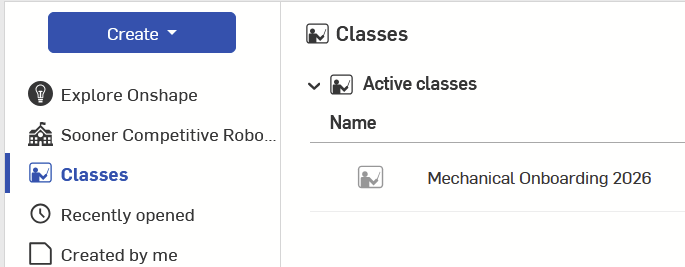
Select the "Aluminum Tube" assignment and start the assignment.
Workspace Basics
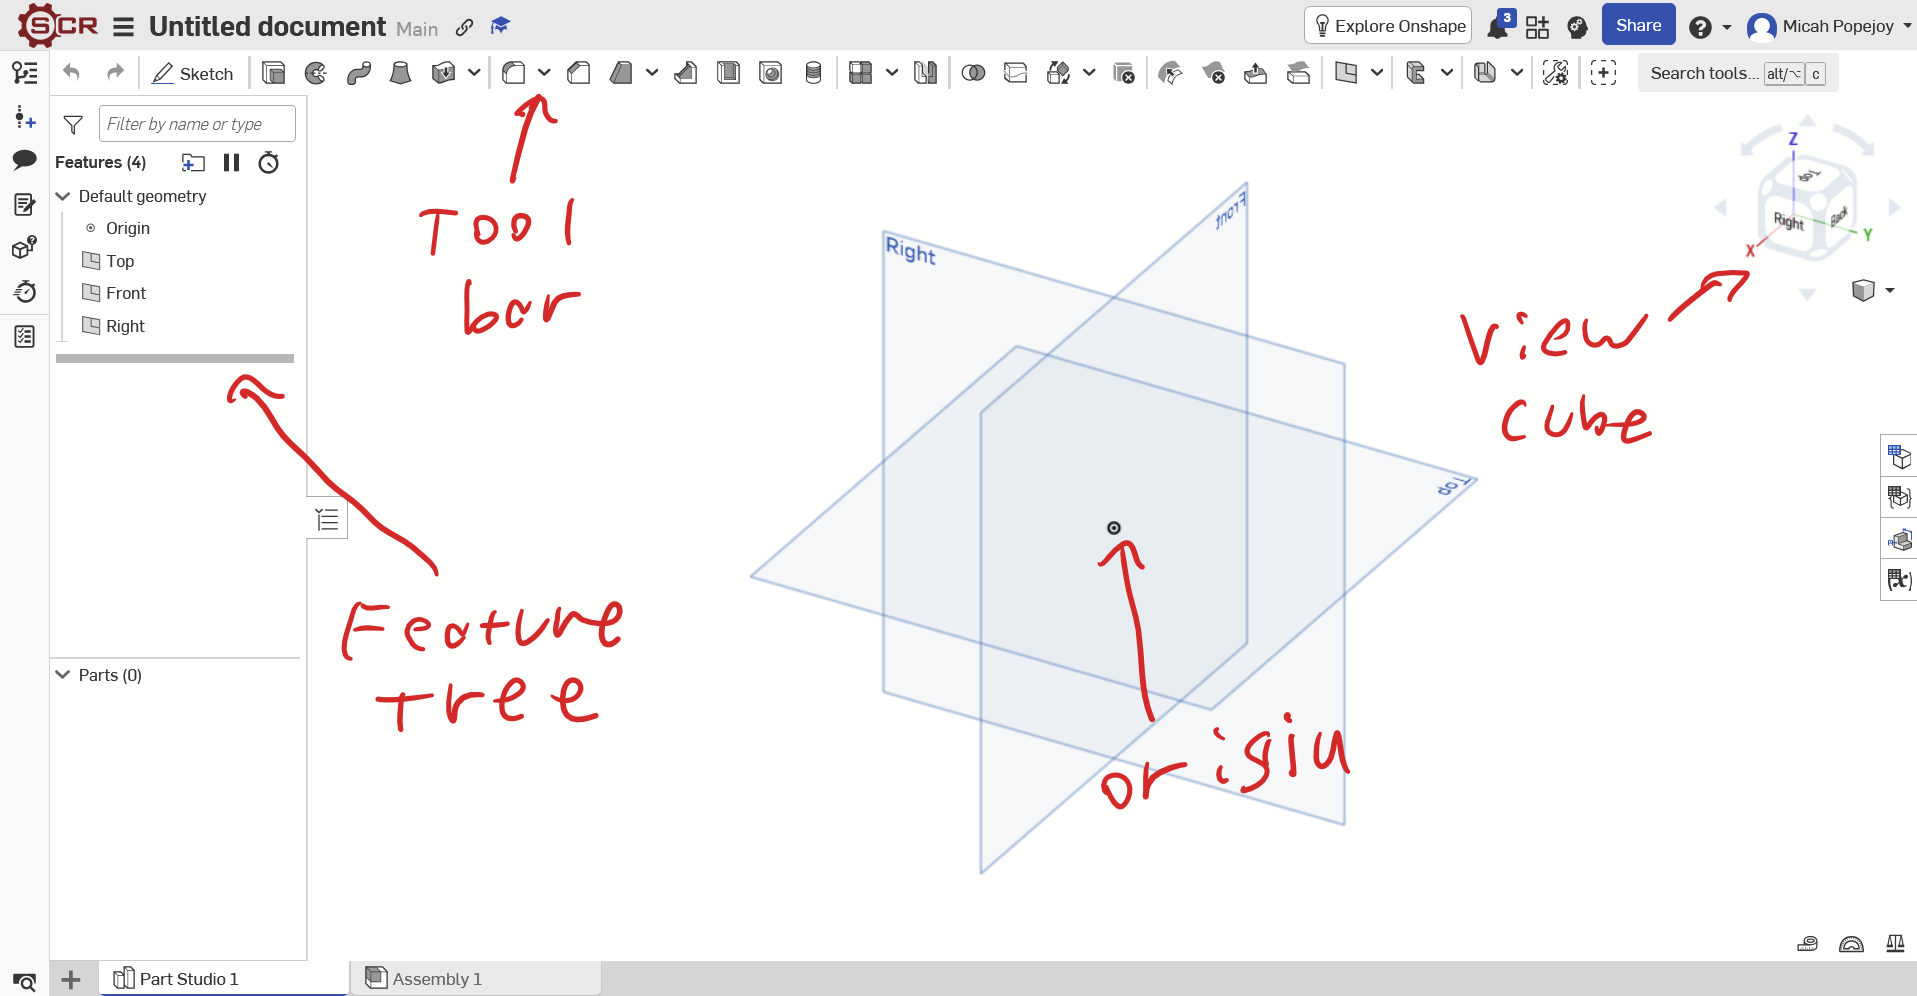
You should see the empty workspace below. Some basic parts of your workspace include the feature tree, which is where you will find all of the important info of the model (including sketches, features, variables, etc). The top of the workspace is your toolbar, which includes all of the tools you will use. The top right has the view cube, which shows the coordinates of the model and allows you to navigate the space by clicking on the various arrows and faces on it.
Navigation
- Dedicated mouse (highly preferred)
- Right-click to orbit around the workspace (kinda of like rotating around)
- Middle mouse button to pan (translate side to side and up and down)
- Can also do Ctrl+Right-click to do the same thing
- Touch-pad
- Can use the same commands as above, but might be difficult
- You can also navigate using the view cube in the top right of the workspace
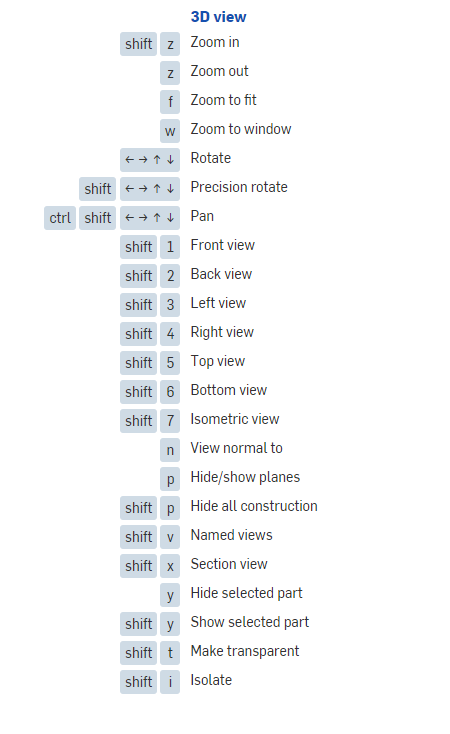
- Or you can use some keyboard controls found below

Aluminum Tube
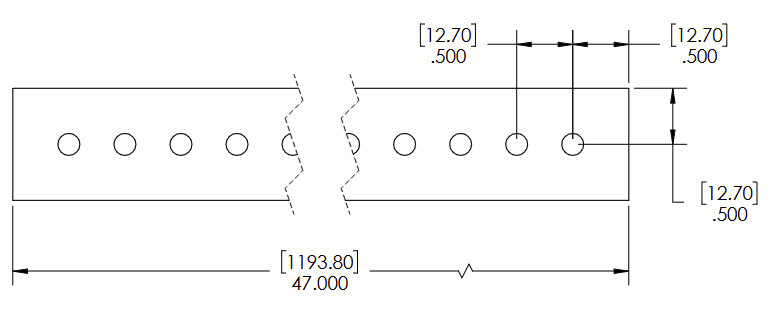
The main project you will be working on is a piece of aluminum extrusion. This is a very simple piece and is commonly encountered for robot structures.
Part Studio
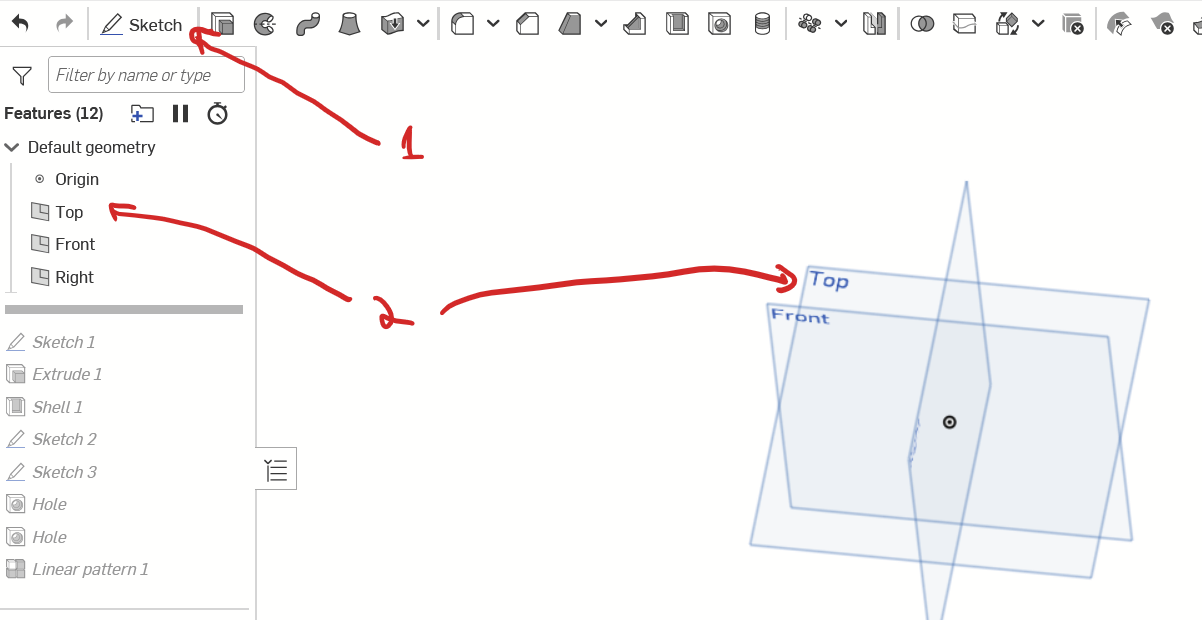
Start out with creating a sketch on the top plane. Do this by clicking Sketch in the top left, and then clicking on the plane named Top.
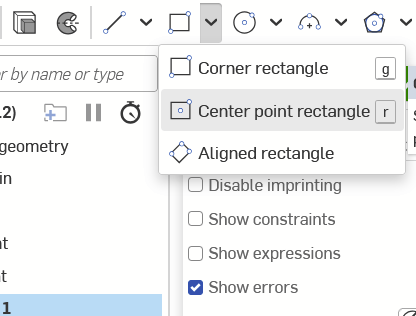
Create a center point rectangle. Do this by clicking on Center Point Rectangle in the top left, and then clicking on the origin (the black and white dot in the workspace) to position it.
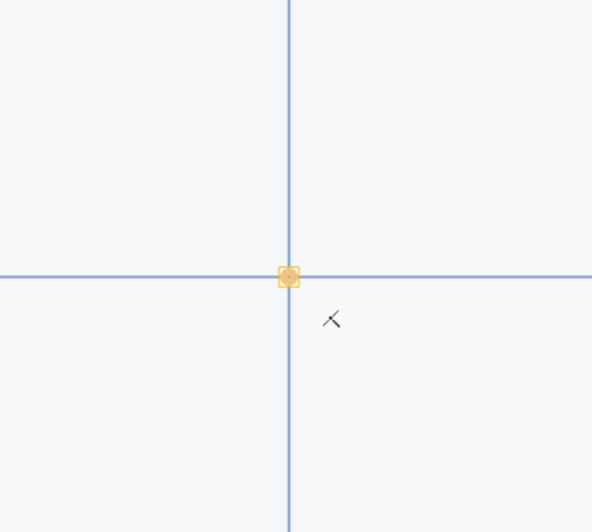
Then just drag out and click to create a rectangle.
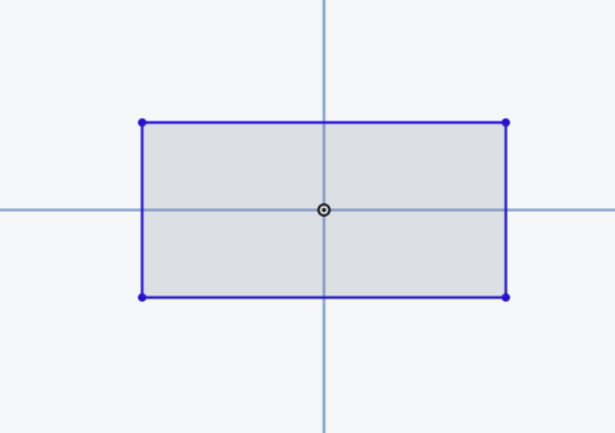
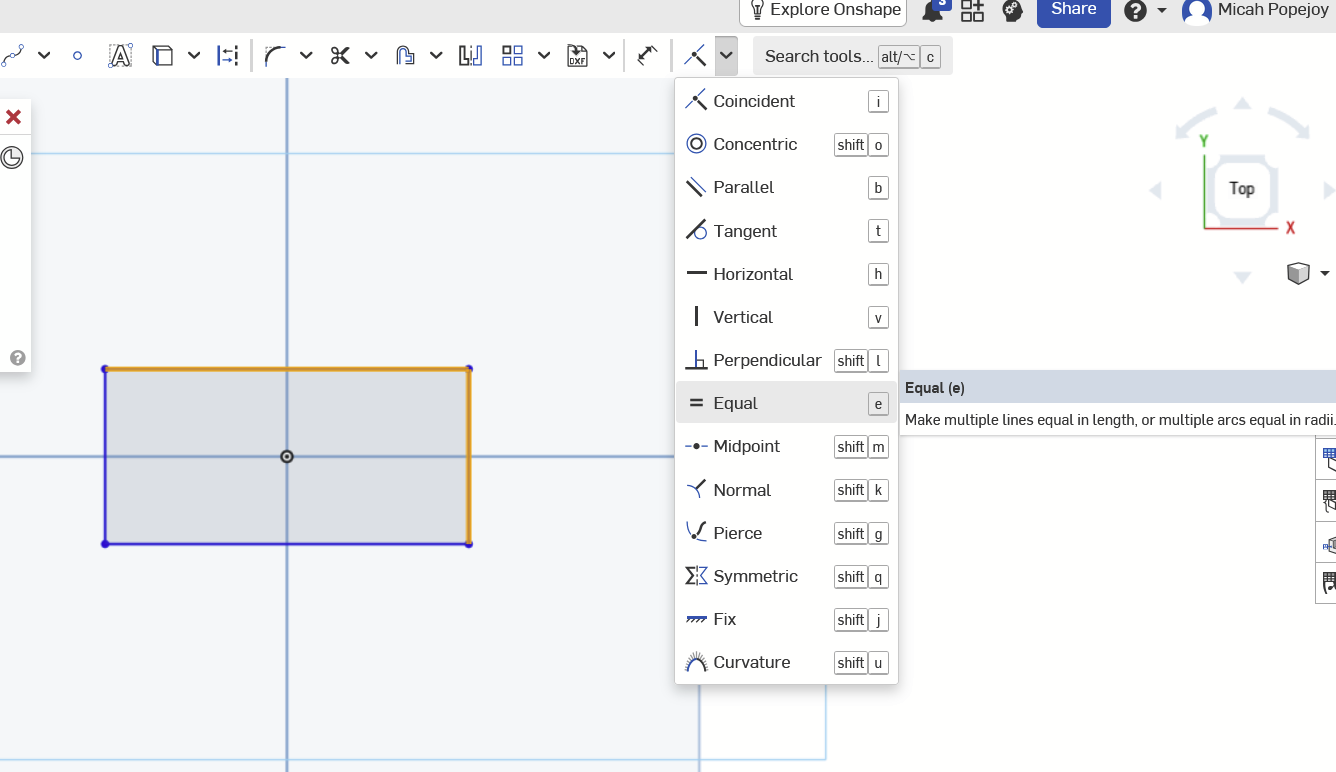
Now, let's turn this rectangle into a square! Click on the perpendicular edges of the rectangle, click on the drop-down constraints menu in the top right, and select equal. Constraints are an important part of sketches. In this case, they ensure that this shape is always a square no matter its dimensions.
Next, click the dimension tool (or d on your keyboard). The dimension tool is among the most important tools for sketches and allows you to define the size of your part. Click on one of the edges of the square, click again to set the dimension, and set it to 1 inch. You can double-click on the dimension to edit it.

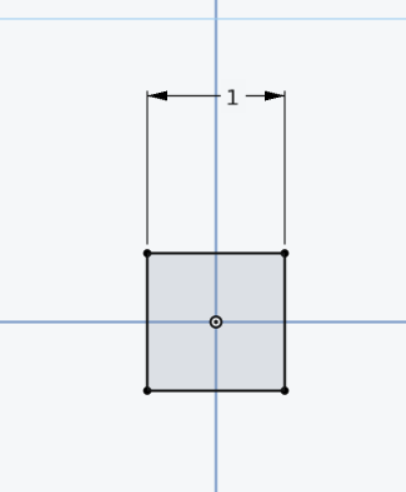
Next, we will bring this into the third dimension! Go ahead and click on the check mark in the sketch window to close the sketch.
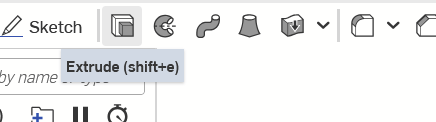
Now that you have exited the sketch, click on Extrude in the top left. Then click on your sketch, and type in a length of 8 inches.
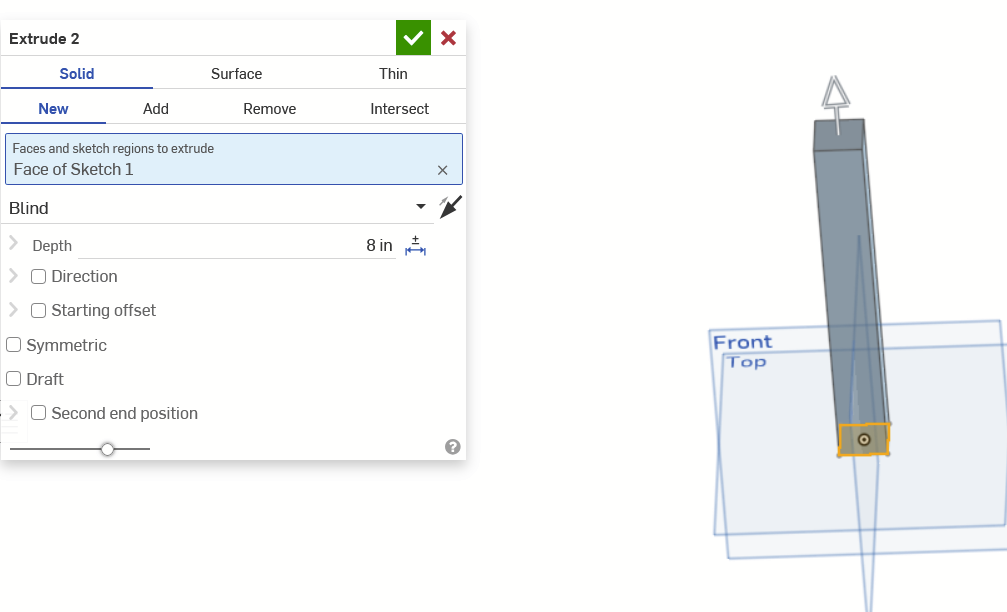
Now you have a 3D part!
Next, we need to hollow out the tube. We will do this with a special tool called the shell tool.

Click on the two square faces of the tube, and set the thickness to 0.125 inches (you can also type 1/8, and onshape will do the math for you).
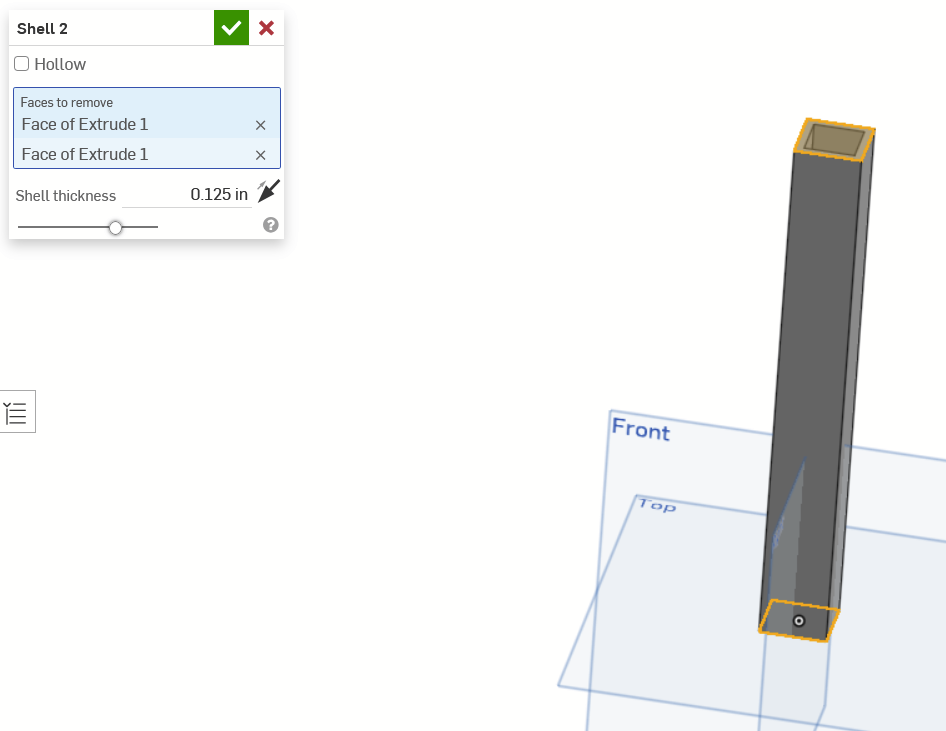
Next, we are going to create the holes. We will do this by first creating the base holes, and then making a pattern of it.
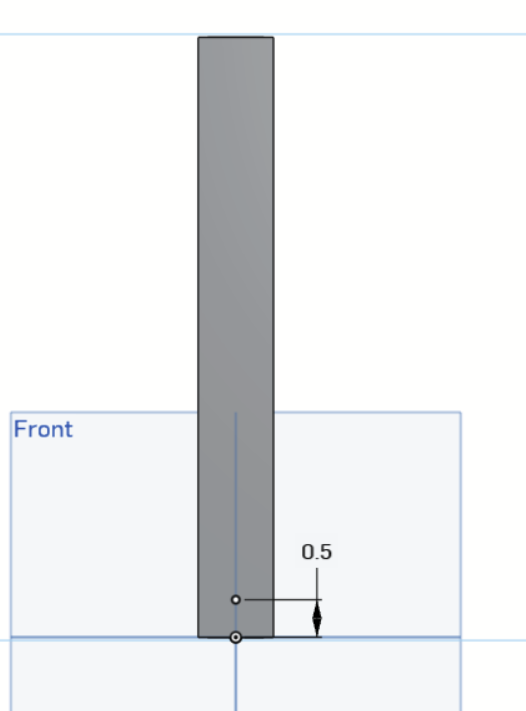
First, create a sketch on one of the faces of the tube, and place a point in the center of the tube, offset by 0.5 inches from the end. We can keep the point in the center by creating a vertical constraint between the origin and the point.
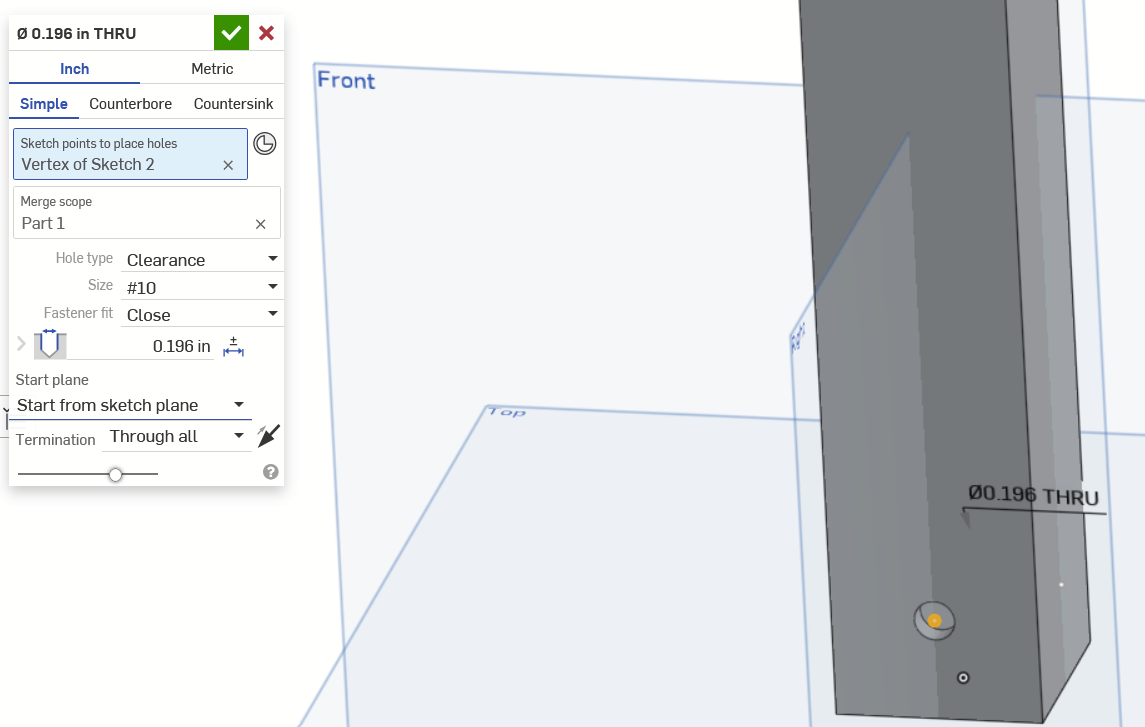
Next, exit the sketch and click on the hole tool. Then click on the point. The hole setting should match the ones in the picture below. Choosing through all allows you to get two holes for the price of one!
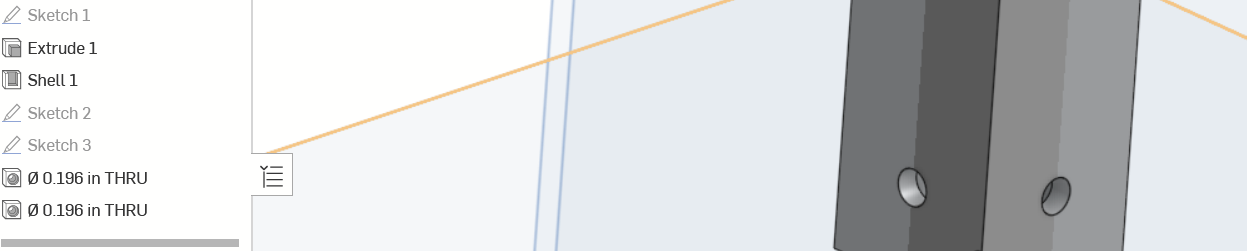
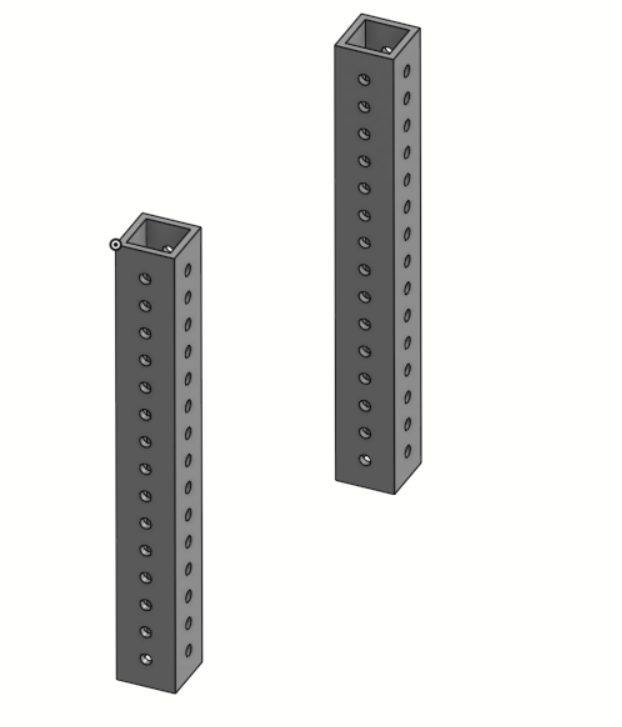
Repeat the above process, but for the perpendicular face of the tube. You should now have 4 holes, one on each side of the tube.
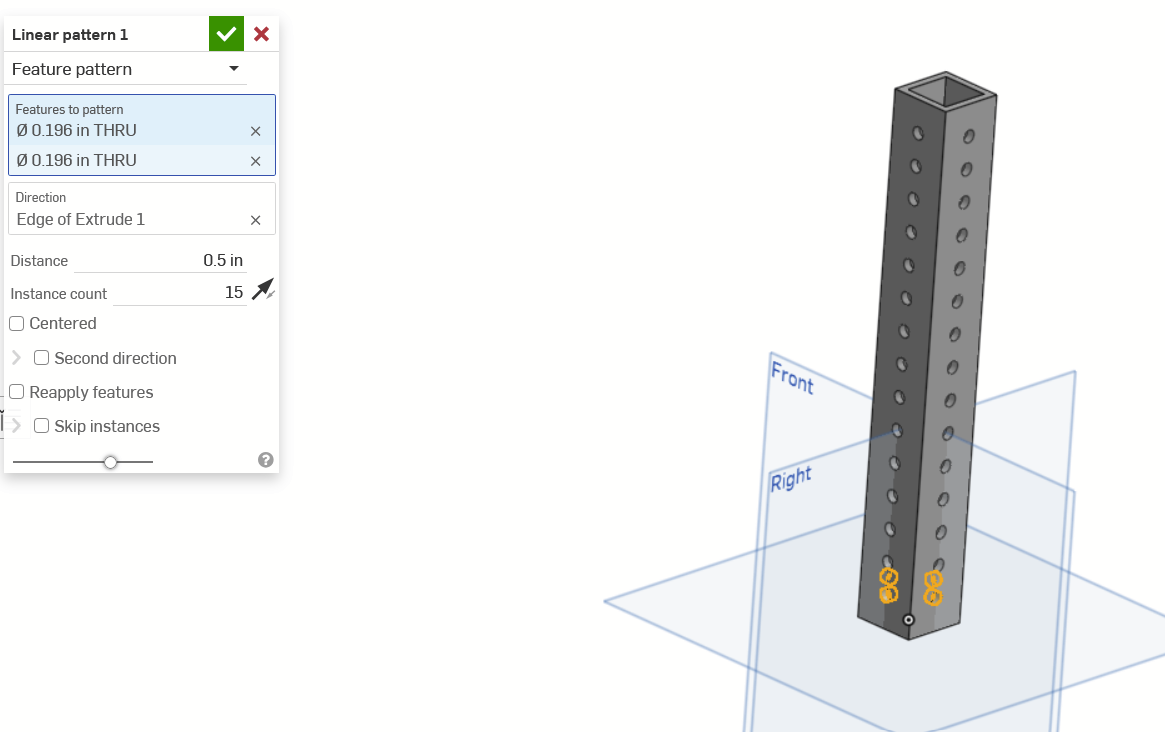
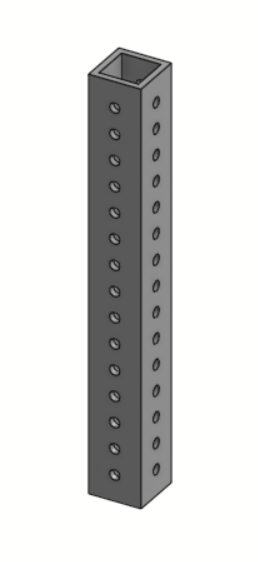
Finally, we will use a linear pattern to repeat the hole all the way up the tube. This allows us to just make the hole once, rather than 15 separate times! Select linear pattern, choose Feature Pattern in the drop-down at the top (Part Pattern is the default and this will NOT work), and then select the two holes you made in the feature tree as your features to pattern. For the direction, choose an edge of the tube that goes the long way. Set the distance to be 0.5 inches, and the instance count to be 15. If the holes go the wrong direction, click on the arrow icon by Instance Count to flip the direction the pattern goes in.
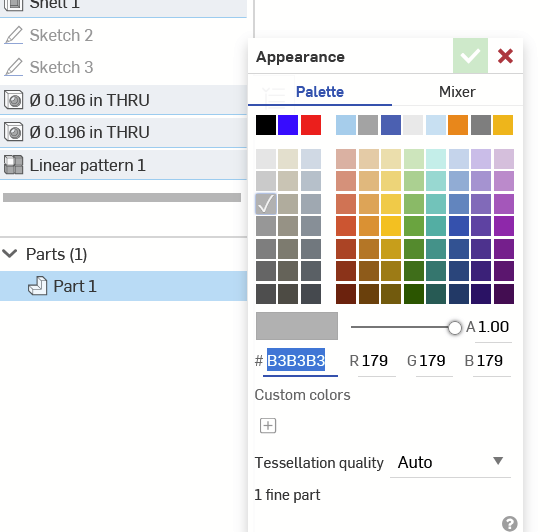
We can also change the color of the model to be more metal-like. Do this by right-clicking Part 1 in the bottom left and selecting Edit Appearance.
You now have an aluminum tube!
Assembly
So now you can create a part, but what if you want to put those parts together? Well, that is what an assembly is for! It allows you to attach parts together to create assemblies and mechanisms that simulate how parts actually go together.
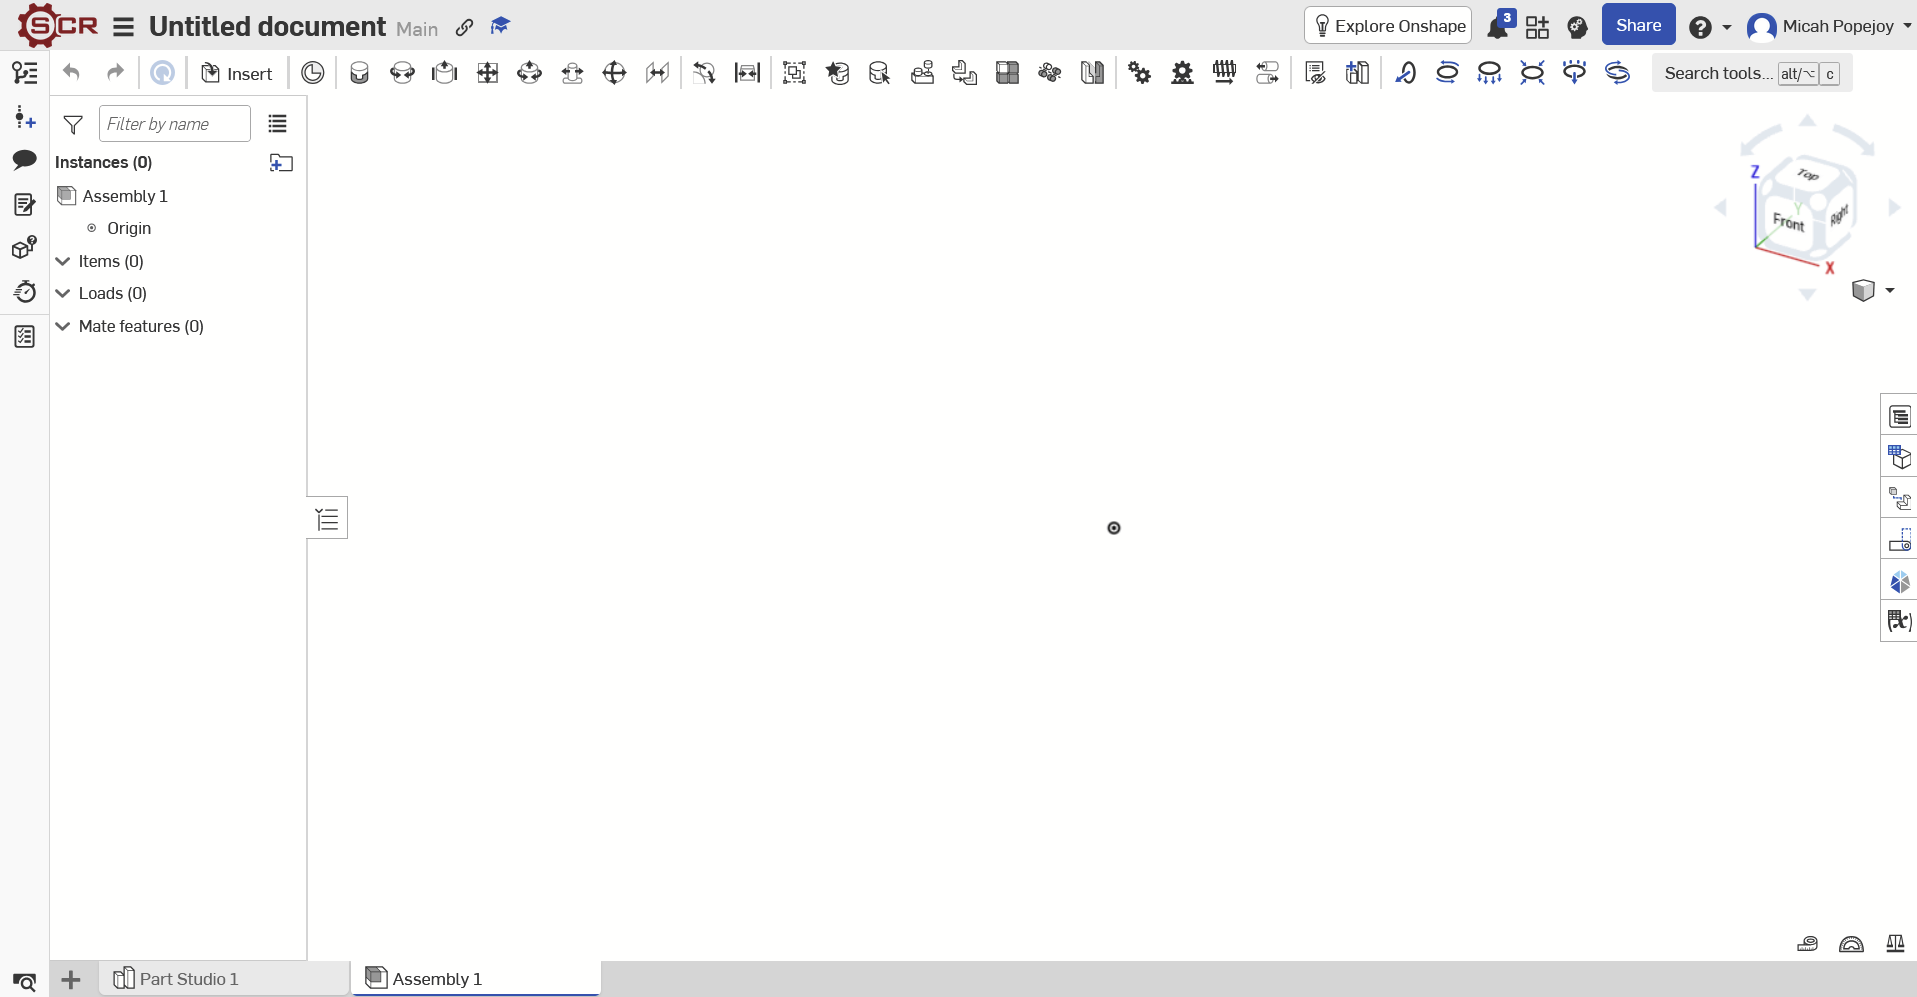
First things first, click on Assembly 1 tab at the bottom of the workspace.

You are now in the assembly workspace! It looks similar, but you will notice that the toolbar has new tools on it, and the feature tree looks a bit different.
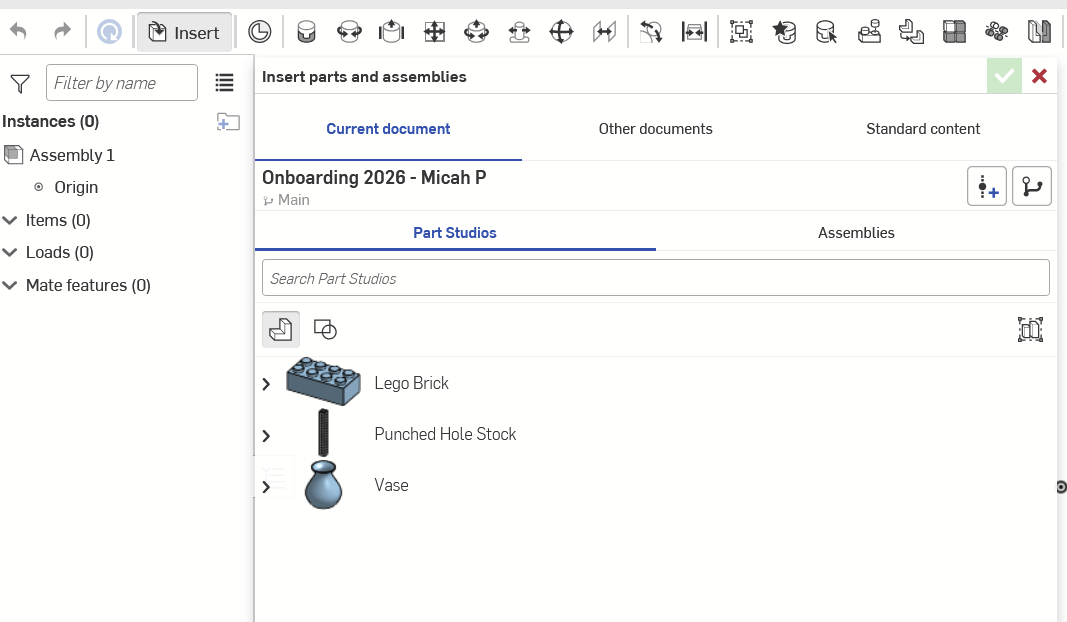
To bring parts into the assembly workspace, click on insert, which will open up a menu that shows the parts you have in the document. Click on the extrusion you've made, and add click anywhere in the workspace to add it.
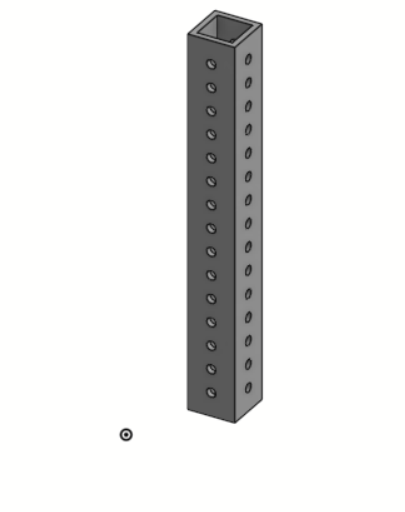
The most important part of assemblies is mates. Mates are how to connect parts together, and what allows them to move. There are various mates with differing degrees of freedom, such as fasten, which allows no movement, or revolute, which allows rotation.
We will first constrain the part to the origin using the fasten mate. Click on one of the corners of the part, and then click on the origin. This is actually a special type of fasten referred to as a locational mate. Establishing a locational mate is important, and assemblies may behave in weird ways if they are not constrained to the origin.
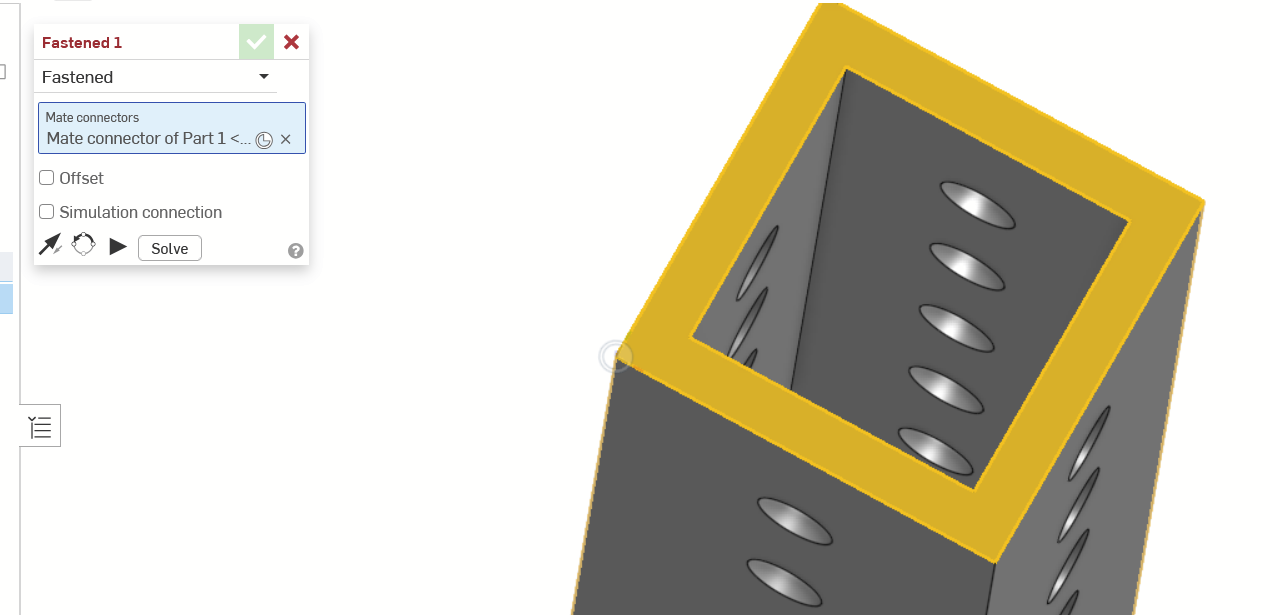
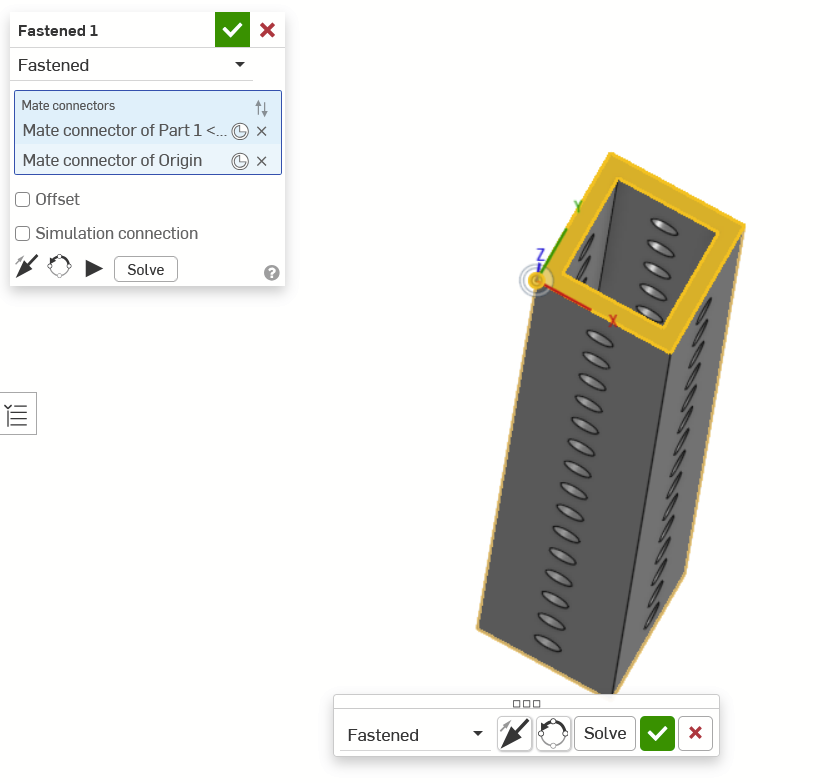
And now it is located! You can see the mate you created in the sidebar.
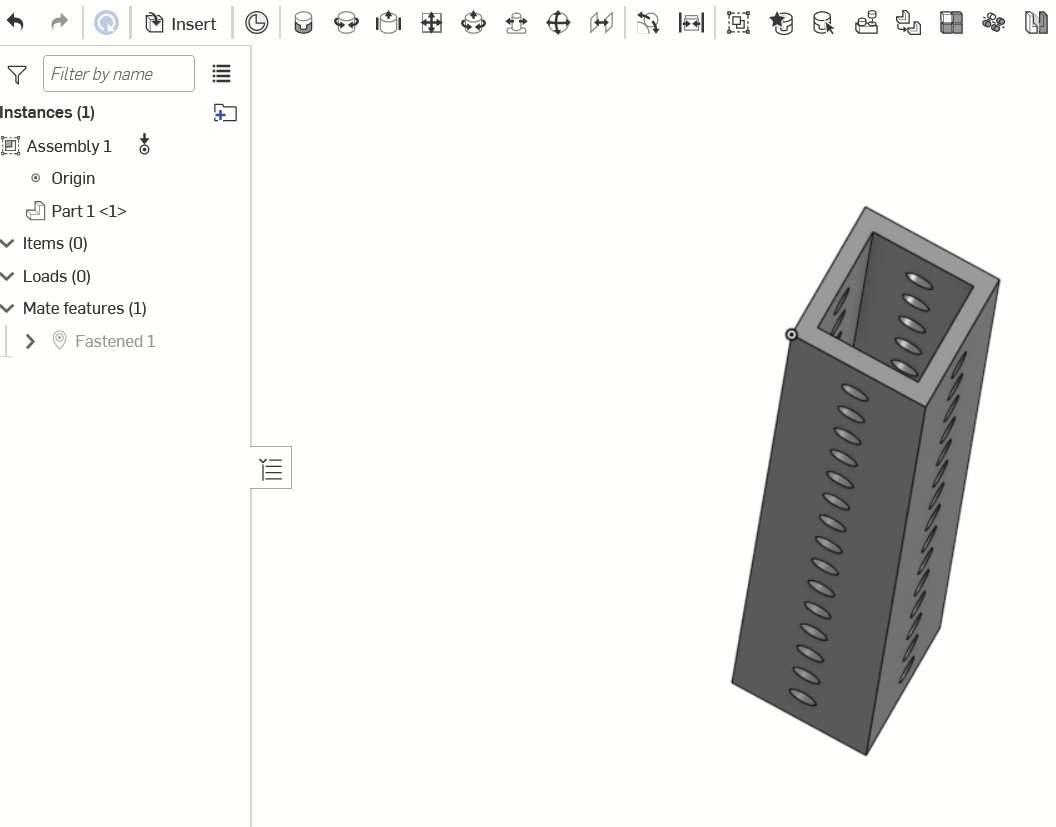
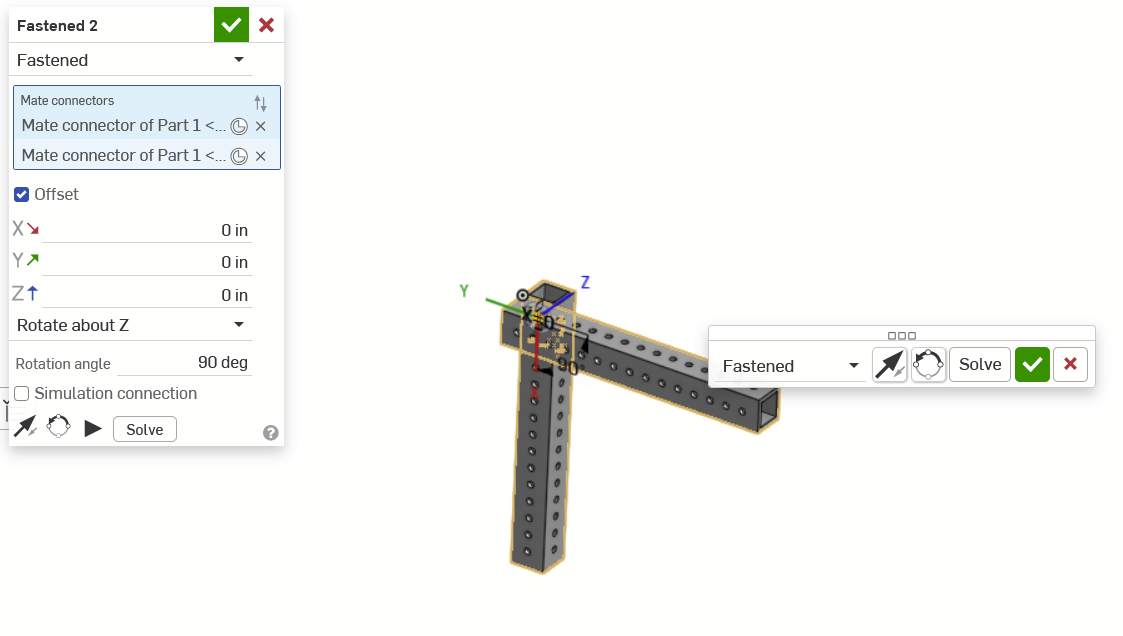
Finally, let's finish it off by adding a second piece of extrusion. We will use the fasten mate between a hole on each part. The fasten mate also allows you to offset the parts either translationally or with rotation, which I did with a 90-degree rotation. You may need to click on the arrow button to flip the orientation of the mates to get it to work properly.
Vase
So now you have created a piece of aluminum extrusion. What next? Here is a quick part that introduces you to a different tool called revolve, which is super useful for circular parts.
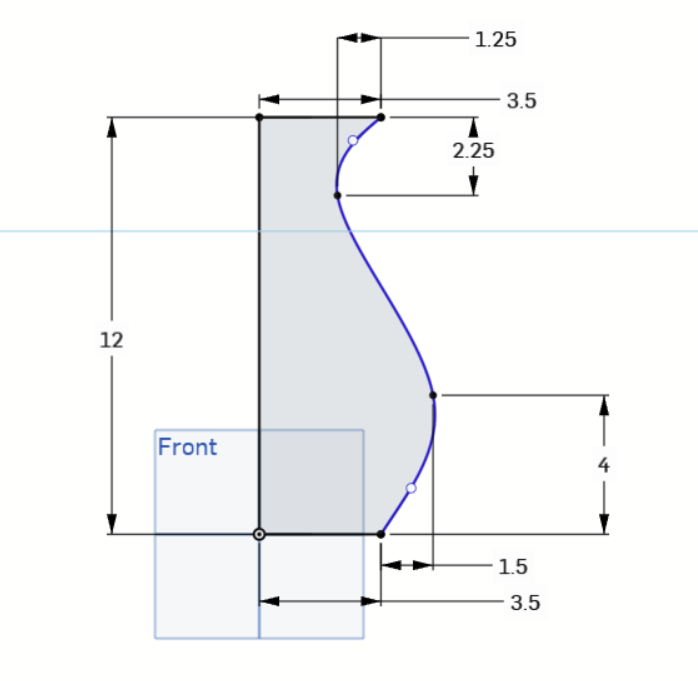
First, create the sketch below. It uses a new tool called spline, which allows you to create curves. Don't worry too much about getting an exactly correct curve; just do something fun! The example below is just a suggestion. The important thing to think in your head that you are drawing half of the vase.
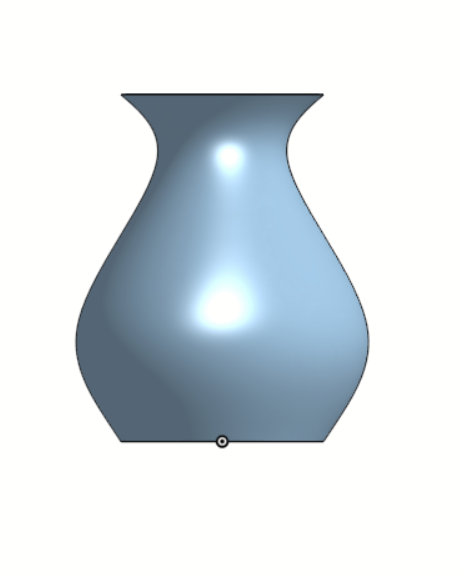
Then exit the sketch. You can now pull the shape into the third dimension using the revolve tool, which is next to extrude. What this tool does is rotate the profile you have drawn around an axis you select. The axis you select in this case is the line that runs down the center of the vase.
The revolve tool is EXTREMELY useful for radially symmetric parts. It is also an important reminder to think outside the box. Oftentimes, a part that would require 5 different extrude operations can be made with only 1 revolve operation.
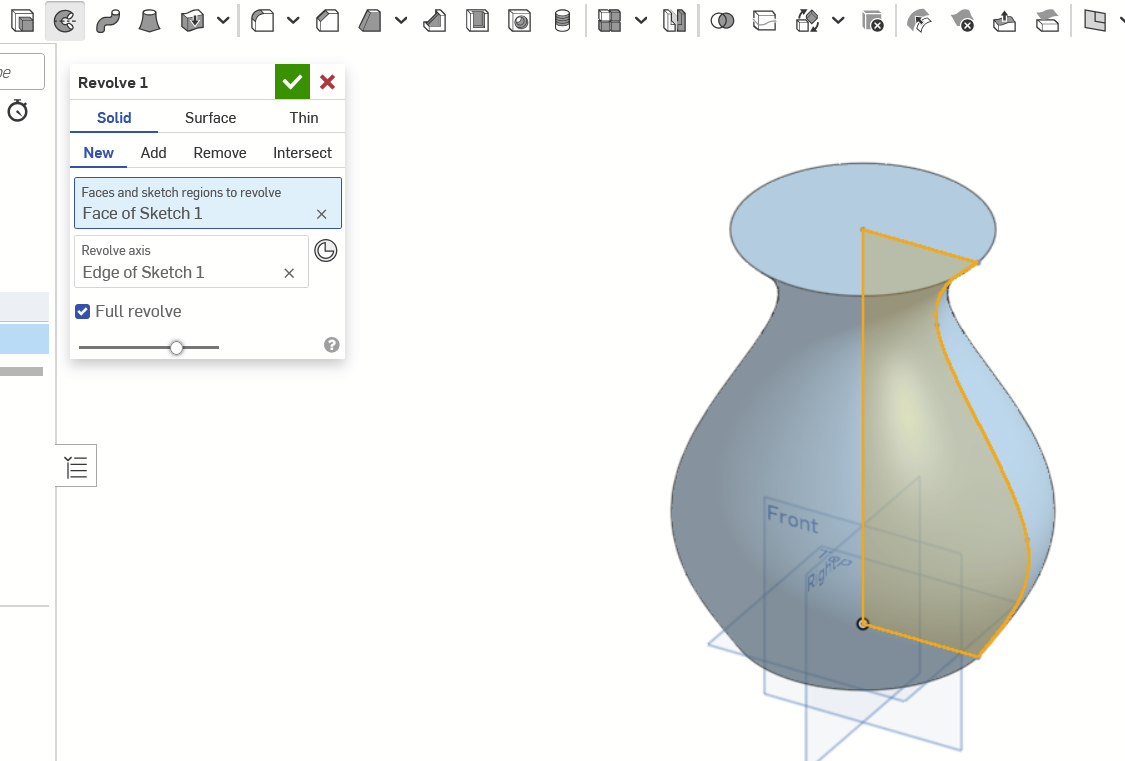
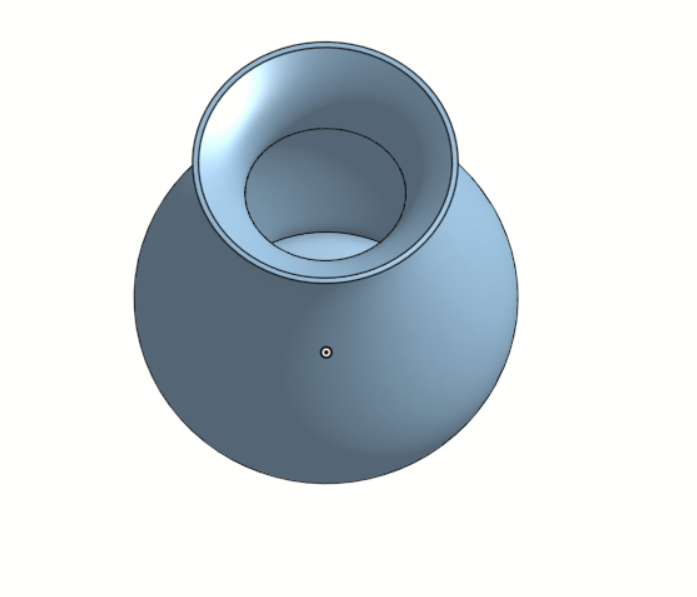
Then you can use the shell tool to hollow out the inside, and ta-da! You have a vase!
Further Learning and Resources
There is MUCH more to CAD than what this onboarding guide is able to get into. If you want to learn more, I highly recommend checking our Onshape official learning center, which gets into much more detail on all of the tools available and how to effectively use them. For Onshape specifically, you can also click on the question mark icon in the top right of the screen whenever you need help with something.
https://learn.onshape.com/